Creating custom reports for performance reviews in Workday can feel like solving a puzzle, especially when you’re trying to pull rating values from review sections into your main Employee Review report. If you’ve found yourself staring at calculated fields wondering why your Lookup Related Value (LRV) won’t work or struggling to figure out which business object to use for an Extract Single Instance (ESI), you’re not alone.
This challenge is one of the most common headaches for Workday system administrators building performance review reports. Let’s break down exactly what’s happening, why it’s happening, and how to solve it step by step.
Understanding the Performance Review Data Structure
Before we dive into solutions, it’s important to understand how Workday structures performance review data. This knowledge is the foundation for solving your reporting challenges.
The Business Object Hierarchy
Workday organizes performance review information across several related business objects. The primary business object for a performance review is Employee Review. This represents the overall review event for an employee.
Within each Employee Review, you have Review Sections. These sections contain the actual ratings and comments for different categories or competencies. A single Employee Review can have multiple Review Sections—for example, one section for technical skills, another for leadership, and so on.
This creates what Workday calls a “one-to-many” or “multi-instance” relationship. One Employee Review has many Review Sections. This is exactly why you’re running into problems.
Why Multi-Instance Fields Create Problems
When you create calculated fields on the Review Sections business object, those fields live at the section level. Each review has multiple sections, which means there are multiple values for your calculated field—one for each section.
The problem arises when you try to use an LRV (Lookup Related Value) to bring this information back to the Employee Review level. LRV expects to find a single value, not multiple values. When it encounters a multi-instance field, it doesn’t know which value to choose, so it fails.
This is where Extract Single Instance (ESI) becomes essential. ESI is specifically designed to solve this exact problem—it extracts one specific instance from a group of related instances based on criteria you define.
Why You Can’t Find the Right ESI Configuration
Many Workday admins struggle with setting up ESI for performance review scenarios. The confusion usually stems from not knowing which business object to use as the foundation and which related field to extract from.
The Source Field Issue
When you create a calculated field as an Extract Single Instance type, you need to specify a “source field” that points to the multi-instance relationship. The key is understanding that this source field must be an instance-type field—specifically, one that represents the connection between your current business object and the related business object where your data lives.
For performance reviews, if you’re working on the Employee Review business object and trying to extract data from Review Sections, you need to find the field on Employee Review that represents its relationship to Review Sections.
Finding the Right Relationship Field
Here’s where many admins get stuck: the field you’re looking for might not be obviously named. In the Employee Review business object, look for a field called “Review Sections” or sometimes “Employee Review Sections.” This is the instance field that contains the connection to all the review sections for that employee review.
This field is what you’ll use as your source when building your ESI. It tells Workday: “Look at all the review sections related to this employee review.”
Step-by-Step Solution for Extracting Review Section Values
Let’s walk through the complete solution for getting manager rating values from review sections into your Employee Review report.
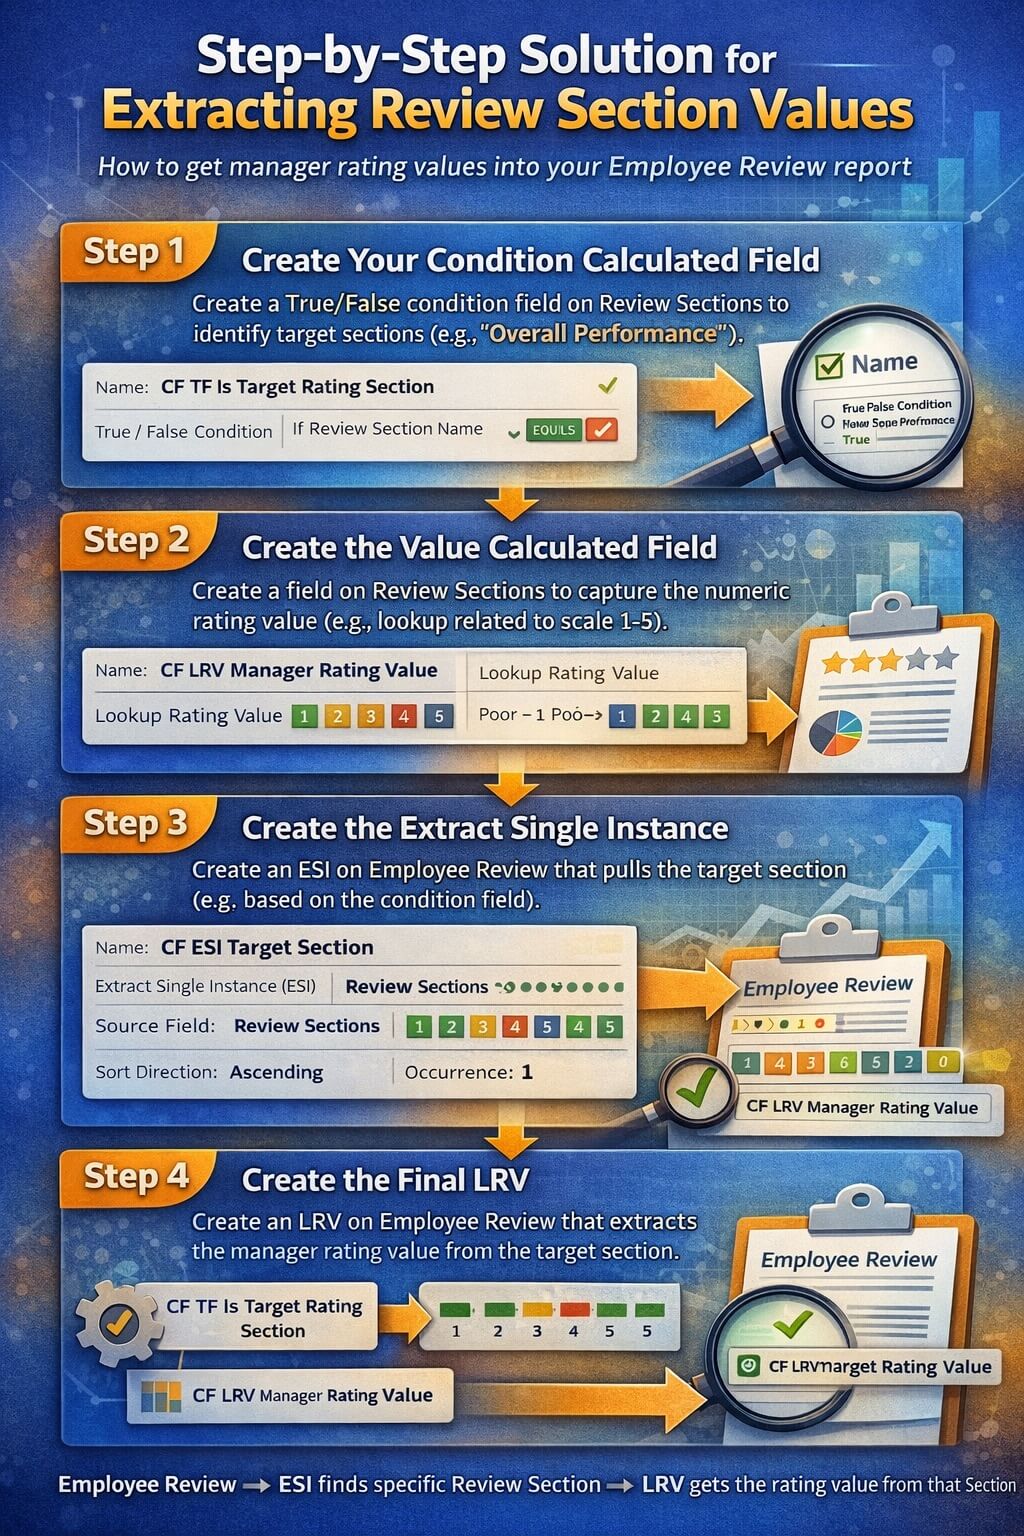
Step 1: Create Your Condition Calculated Field
First, you need a way to identify which review section you want to extract. Since you mentioned wanting the manager rating for specific sections, you’ll create a True/False calculated field on the Review Sections business object that identifies the sections you care about.
Navigate to the Review Sections business object and create a new calculated field of type “True/False Condition.” Name it something descriptive like “CF TF Is Target Rating Section.”
In your condition, specify what makes this the section you want. For example, if you’re looking for sections with a specific rating scale or section name, your condition might check: “Review Section Name equals ‘Overall Performance'” or whatever identifies your target section.
Step 2: Create the Value Calculated Field
Still on the Review Sections business object, create another calculated field that captures the actual rating value you want. This might be a Lookup Related Value that gets the numeric value associated with the manager’s rating choice.
For example, if managers select from a rating scale (like 1-5 or “Exceeds Expectations”), you want the underlying numeric value, not just the display text. Create a calculated field called something like “CF LRV Manager Rating Value” that looks up this numeric value from the rating scale.
You now have two calculated fields on Review Sections:
- A True/False that identifies which section you want
- A field that contains the value you want to extract
Step 3: Create the Extract Single Instance
Now move to the Employee Review business object. This is where you’ll create your ESI to pull the rating value up from the sections level.
Create a new calculated field of type “Extract Single Instance (ESI).” Name it descriptively, like “CF ESI Target Section.”
For the source field, select the instance field that connects Employee Review to Review Sections. This is typically called “Review Sections” or “Employee Review Sections.” This field contains all the review sections for this employee review.
For the condition, select your True/False calculated field from Step 1 (“CF TF Is Target Rating Section”). This tells the ESI to only consider review sections where your condition is true.
For the sort field, choose something that will consistently order your sections. If you only expect one section to match your condition, the sort field doesn’t matter much—you can use any field from Review Sections. If multiple sections might match, choose a field that will help you get the right one (like section order number or creation date).
Set the sort direction (ascending or descending) based on whether you want the first or last matching section.
Set occurrence to 1 (for the first matching instance) or whatever number makes sense for your use case.
This ESI now returns a single Review Section instance—specifically, the one that matches your criteria.
Step 4: Create the Final LRV
You’re almost there! You now have an ESI that points to a specific Review Section, but you still need to get the value out of it.
Create one more calculated field on the Employee Review business object. This will be a Lookup Related Value (LRV). Name it something like “CF LRV Manager Rating Value.”
For the source field, select your ESI from Step 3 (“CF ESI Target Section”). This tells the LRV where to look.
For the lookup value, select your value calculated field from Step 2 (“CF LRV Manager Rating Value” from the Review Sections business object).
This final LRV follows the path: Employee Review → ESI finds specific Review Section → LRV gets the rating value from that section.
Using Multiple Rating Sections
What if you need to extract values from two different review sections—for example, one section for technical skills and another for leadership?
The solution is to create separate ESI and LRV pairs for each section:
For Technical Skills Section:
- Create “CF TF Is Technical Skills Section” (condition that identifies technical section)
- Create “CF ESI Technical Skills Section” (ESI using that condition)
- Create “CF LRV Technical Skills Rating” (LRV from the ESI)
For Leadership Section:
- Create “CF TF Is Leadership Section” (condition that identifies leadership section)
- Create “CF ESI Leadership Section” (ESI using that condition)
- Create “CF LRV Leadership Rating” (LRV from the ESI)
Each pair works independently to extract different values from different sections.
Common Mistakes and How to Avoid Them
Mistake 1: Storing the Calculated Field on the Wrong Business Object
One of the most frequent errors is creating your final calculated fields on Review Sections instead of Employee Review. Remember: Your ESI and final LRV must live on the Employee Review business object because that’s where your report is pulling data from.
Your helper fields (the condition and value fields) stay on Review Sections, but the extraction fields move up to Employee Review.
Mistake 2: Using the Wrong Source Field for ESI
If your ESI isn’t showing the right source field as an option, you’re probably not starting from the right business object or you’re looking for the wrong field name.
The source field for ESI must be an instance-type field. Use the “Related Actions” menu on the Employee Review business object and select “Report Fields and Values” to see all available fields and identify which ones are instance fields pointing to Review Sections.
Mistake 3: Not Testing with Real Data
Always test your calculated fields with actual employee reviews that have the data you’re trying to extract. Create a simple custom report using the Employee Review business object, add your calculated fields, and run it for a test employee. This lets you see immediately if your fields are working correctly.
Mistake 4: Forgetting About Performance
Calculated fields impact report performance. Each ESI makes Workday evaluate multiple instances and apply conditions. If you’re building a report that will run for thousands of employees, test it with a small sample first to ensure acceptable performance.
Alternative Approaches
Depending on your exact requirements, there might be simpler alternatives to the ESI/LRV approach.
Using Report-Specific Calculated Fields
If you only need this value in one specific report, consider creating a report-specific calculated field directly in your report definition. While this doesn’t solve the multi-instance problem, it might give you options for handling the data differently within the report structure.
Leveraging Matrix Reports
For some performance review reporting needs, a matrix report that pivots on review sections might be more appropriate than trying to flatten everything into a single row per employee. This approach naturally handles the one-to-many relationship by creating columns for each section.
Checking for Delivered Fields
Before building complex calculated fields, always check if Workday has delivered a field that does what you need. Search in the Employee Review business object for fields related to ratings, overall scores, or summary values. Workday often includes aggregate fields that might save you from building custom calculations.
Troubleshooting Your Configuration
If you’ve followed the steps and your fields still aren’t working, here’s how to troubleshoot:
Check Your Condition
Add your True/False condition field directly to a report on Review Sections. Does it return True for the sections you expect? If not, your condition logic needs adjustment.
Verify Your Value Field
Add your value calculated field to a report on Review Sections. Does it show the correct numeric values? If it’s blank or wrong, fix this before moving to the ESI.
Test Your ESI
Add your ESI field to a report on Employee Review. Does it return a Review Section instance? You won’t see the rating value yet, but you should see that it’s pointing to something. If it’s blank, your condition might not be matching any sections, or your source field might be wrong.
Validate Your Final LRV
Finally, add your LRV to your Employee Review report. This should show the actual rating value. If it’s blank but your ESI is working, check that you’re looking up the right field from the Review Section.
Use “Where Used” to Track Dependencies
Workday’s “Where Used” feature (found in the related actions menu of any calculated field) shows you exactly where that field is being used. This helps you track the chain of calculated fields and ensure everything is connected correctly.
Performance Considerations for Large Datasets
When building calculated fields for performance reviews, especially in large organizations, keep these performance tips in mind:
Minimize ESI Complexity: Keep your condition logic as simple as possible. Complex conditions slow down the ESI evaluation.
Use Specific Conditions: The more specific your condition, the fewer instances Workday needs to evaluate. Instead of checking multiple things with OR logic, consider whether you can use a more targeted single condition.
Test Before Deploying: Always test new calculated fields on a small population before running organization-wide reports. This helps you catch performance issues early.
Consider Delivered Alternatives: Sometimes the delivered fields, even if not exactly what you want, perform better than custom calculated fields because they’re optimized in the database.
Best Practices for Workday Calculated Fields
Based on experience with performance review reporting, here are best practices to follow:
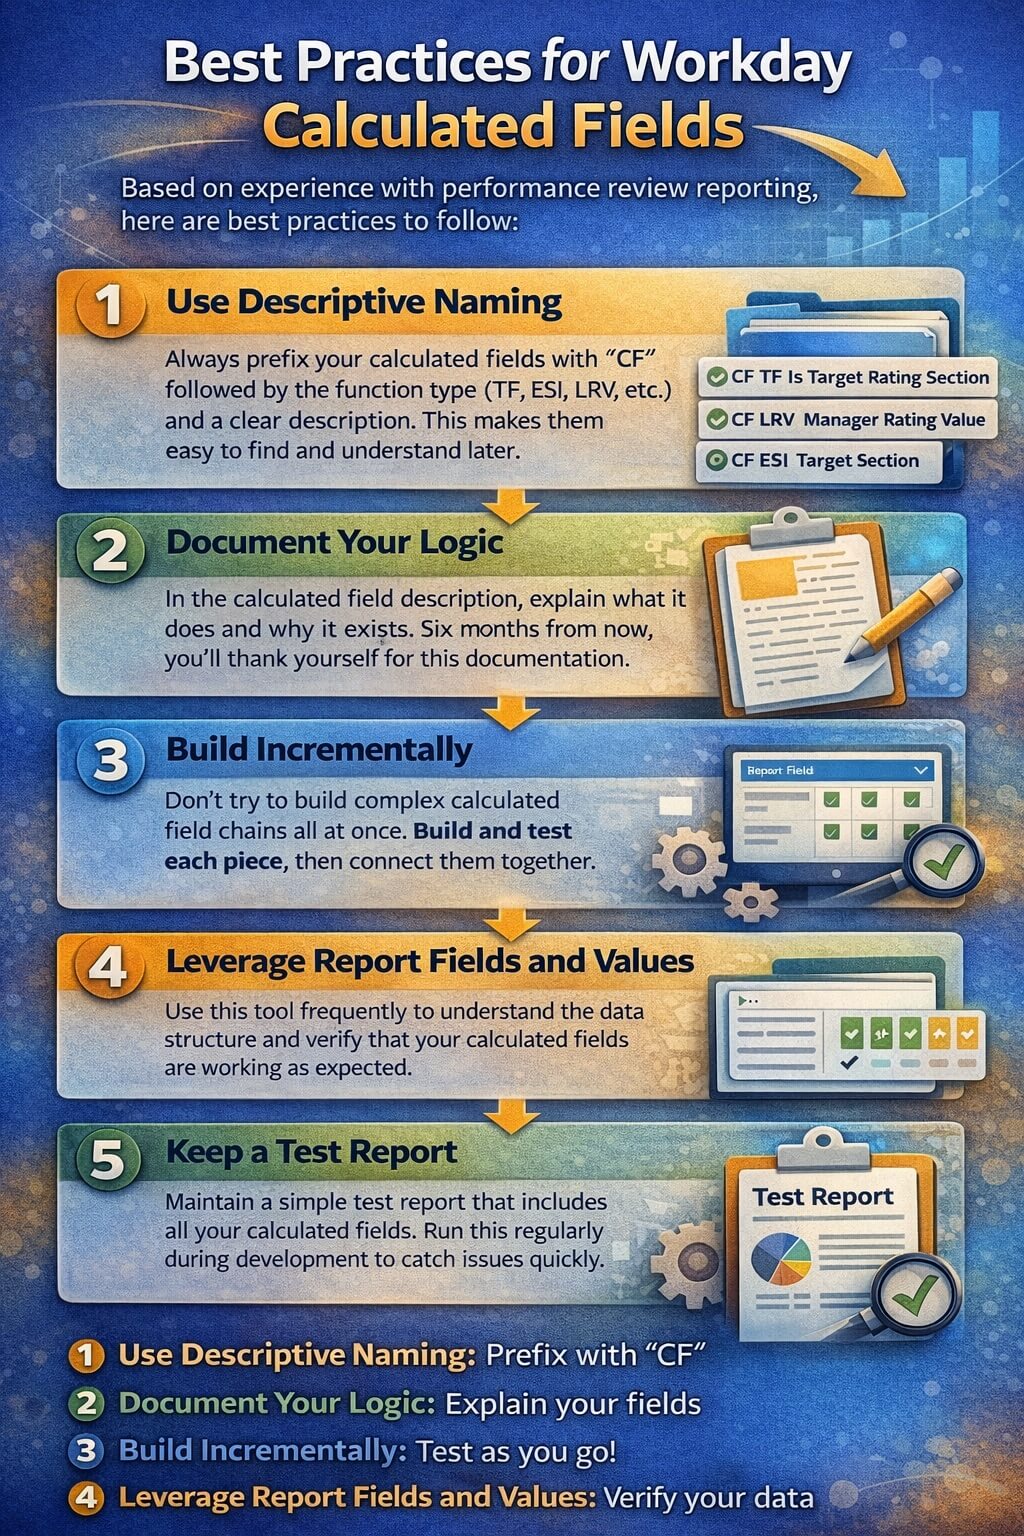
Use Descriptive Naming: Always prefix your calculated fields with “CF” followed by the function type (TF, ESI, LRV, etc.) and a clear description. This makes them easy to find and understand later.
Document Your Logic: In the calculated field description, explain what it does and why it exists. Six months from now, you’ll thank yourself for this documentation.
Build Incrementally: Don’t try to build complex calculated field chains all at once. Build and test each piece, then connect them together.
Leverage Report Fields and Values: Use this tool frequently to understand the data structure and verify that your calculated fields are working as expected.
Keep a Test Report: Maintain a simple test report that includes all your calculated fields. Run this regularly during development to catch issues quickly.
Getting Additional Help
If you’re still stuck after trying these solutions, here are resources that can help:
Workday Community: The Workday Community has extensive discussions about calculated fields and reporting. Search for topics related to ESI, LRV, and performance review reporting.
Workday Documentation: The M-274 documentation for calculated fields provides detailed technical specifications for each function type.
Report Fields and Values: This underutilized tool (found in the related actions menu of any business object) shows you every available field and how they’re related. It’s invaluable for understanding data structures.
Workday Support: For complex scenarios, Workday support can provide guidance specific to your tenant configuration and performance review setup.
Peer Workday Admins: Connect with other Workday administrators through user groups, conferences, or online forums. Many have solved similar challenges and can offer practical advice.
The Bottom Line
Extracting values from multi-instance review sections into single-instance employee review reports is a common challenge that every Workday admin faces eventually. The solution requires understanding the relationship between business objects and using the right combination of calculated field types.
The key steps are:
- Create helper fields (condition and value) on the Review Sections business object
- Create an ESI on Employee Review that uses the instance field connecting to Review Sections
- Use your condition to identify which section to extract
- Create an LRV that gets the value from your extracted section
While it might seem complicated at first, this pattern becomes second nature once you understand it. The same logic applies to many other Workday reporting scenarios involving multi-instance relationships—job history, compensation changes, organization assignments, and more.
With patience and systematic testing, you’ll be able to build robust performance review reports that give your organization exactly the insights they need.